如果这篇博客帮助到你,可以请我喝一杯咖啡~
Supported macOS versionsPermalink
- Monterey (macOS 12)
- Big Sur (macOS 11)
- Catalina (macOS 10.15)
Older macOS versions might work, but we don’t officially support them.
Install RubyPermalink
To install Jekyll on macOS, you need a proper Ruby development environment. While macOS comes preinstalled with Ruby, we don’t recommend using that version to install Jekyll. This external article goes over the various reasons why you shouldn’t use the system Ruby.
Instead, you’ll need to install a separate and newer version of Ruby using a version manager such as asdf, chruby, rbenv, or rvm. Version managers allow you to easily install multiple versions of Ruby, and switch between them.
We recommend chruby because it’s the simplest and least likely to cause issues.
The instructions below are an excerpt from this detailed external guide to install Ruby on Mac. They work best if you’re setting up development tools for the first time on your Mac. If you’ve already tried to install Ruby or Jekyll on your Mac, or if you run into any issues, read that guide.
Step 1: Install HomebrewPermalink
Homebrew makes it easy to install development tools on a Mac.
/bin/bash -c "$(curl -fsSL https://raw.githubusercontent.com/Homebrew/install/HEAD/install.sh)"
Step 2: Install chruby and the latest Ruby with ruby-installPermalink
Install chruby and ruby-install with Homebrew:
brew install chruby ruby-install
Install the latest stable version of Ruby:
ruby-install ruby
This will take a few minutes, and once it’s done, configure your shell to automatically use chruby:
echo "source $(brew --prefix)/opt/chruby/share/chruby/chruby.sh" >> ~/.zshrc
echo "source $(brew --prefix)/opt/chruby/share/chruby/auto.sh" >> ~/.zshrc
echo "chruby ruby-3.1.1" >> ~/.zshrc
If you’re using Bash, replace .zshrc with .bash_profile. If you’re not sure, read this external guide to find out which shell you’re using.
Quit and relaunch Terminal, then check that everything is working:
ruby -v
It should show ruby 3.1.1p18 (2022-02-18 revision 53f5fc4236) or a newer version.
Next, read that same external guide for important notes about setting and switching between Ruby versions with chruby.
Install JekyllPermalink
After installing Ruby with chruby, install the latest Jekyll gem:
gem install jekyll
TroubleshootingPermalink
See Troubleshooting or ask for help on our forum.
然后,翻了一些网上的教程,用Hexo框架和NexT主题搭了一个比较素雅的符合个人审美的博客。然而,Hexo 搭建的博客需要先在本地生成博客页面然后再上传到服务器上,每次发博客都需要在电脑重新生成页面并上传,感觉没有那么方便。在不同电脑上想要发博客更是十分困难,感觉如果胡乱操作后本地部署的文件发生了一定的错乱,恢复起来会十分麻烦。
后来发现,Github Pages 原生支持Jekyll,因此如果只需要推送文章可以直接在 github 的仓库里做。于是决定在期末考试后用 Jekyll 重新搭建个人博客。原来的博客不再维护。
构思
目前博客的 demo 如下:
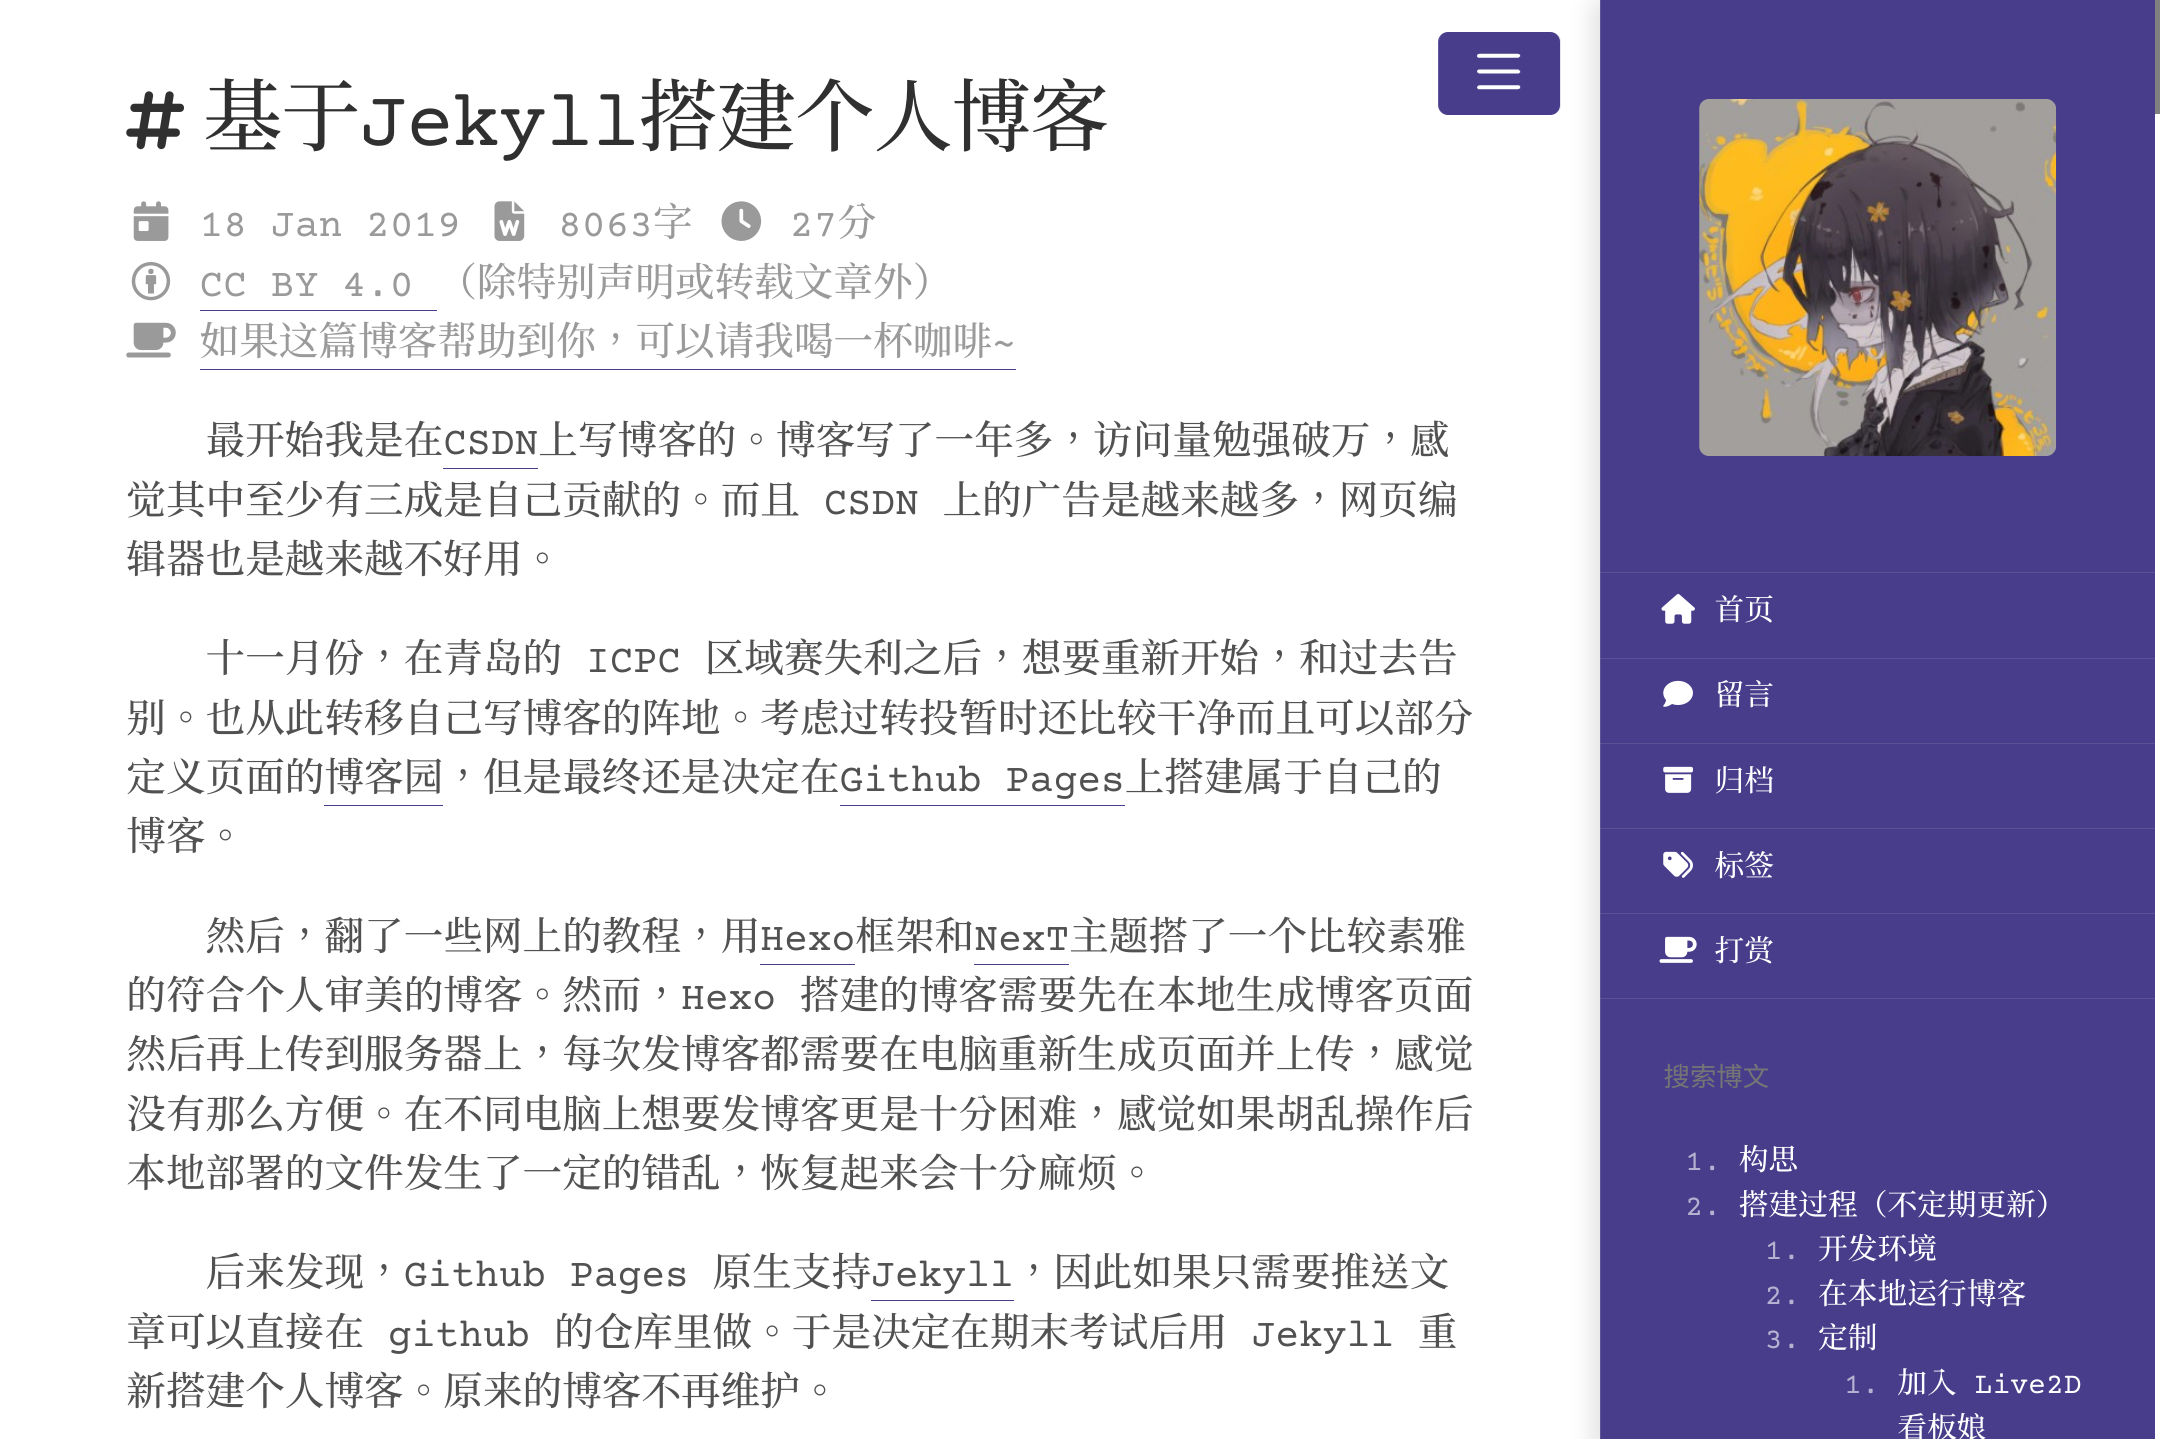
想搭建一个足够干净、页面几乎不要有多余元素的博客,同时博客的功能还要足够丰富,满足我以下的需求:
- 用 Markdown 写博客
- 支持 Latex 公式
- 支持 mermaid 等插件
- 个性化 Live2D
- 分享一些我在其他网站的个人账号
- 移动端适配
- 足够快的加载速度
- 访问量统计,评论互动
- 需求是会逐渐增长的!
其中,Live2D 是我某次访问别人的博客初次见到的,感觉非常吸引人。最终的目标是去掉网页上所有多余的元素,只剩下博文和 Live2D 看板娘,看板娘本身还可以作为博客访问的导航,感觉会十分有新意。
搭建过程(不定期更新)
我目前读的专业是计科超算方向,所以软件工程专业相关方面的基础几乎为 0😌,大部分的内容都是参考网上教程慢慢摸索的,假如对某些过程有意见和建议欢迎向我提出!
开发环境
我的博客使用 bundle 作为版本管理!如果你的环境里已经有 bundle 了,可以跳过此步!
这个学期选了一门 Linux 相关的公选课,感觉还不错,因此直接把开发环境是搭建在 Windows Subsystem for Linux(简称 WSL)上了,Windows 下也可以直接访问其中的环境,详见这篇博客。
sudo apt install -y ruby ruby-dev make gcc g++ zlib1g-dev
# gem sources --add https://gems.ruby-china.com/ --remove https://rubygems.org/
sudo gem install bundler
# bundle config mirror.https://rubygems.org https://gems.ruby-china.com
jekyll 博客是基于 ruby 语言开发的,要先将 ruby 装进来。此外,国内访问一些资源可能会很慢,推荐去掉上面的注释,使用国内镜像。
在本地运行博客
依次执行下述指令,可以自动下载并部署我博客的所有依赖。
git clone https://github.com/wu-kan/wu-kan.github.io
cd wu-kan.github.io
bundle install
如果不想下载我的博文和图片,可以根据这个issue,使用 svn 代替 git,从而快速下载必要的文件。
svn checkout https://github.com/wu-kan/wu-kan.github.io/trunk/ --depth=files
github 上的 jekyll 和普通的 jekyll 是有一点点区别的,比如说只支持特定的插件。我希望与 github 保持兼容,因此配置的依赖是直接引入了 github 版本的 jekyll,安装时间略久。
我在一个全新的 Linux 中安装了一遍,需要的依赖已经在上面的「开发环境中列出来的」。如果bundle install在你的机器上还是报错,要看报错信息,缺啥装啥。
运行下述指令,检验(我自己做的时候遇到了一个很奇怪的问题jekyll 3.8.5 | Error: Operation not permitted @ apply2files,重开 WSL 终端就好了):
bundle exec jekyll s
由于我的博客已经达到了三百篇以上,在本地生成网页的速度有些慢,在我的机器上要跑三分钟(关掉配置项中的侧边栏总字数统计就快了,可达 25s)。
    Server address: http://127.0.0.1:4000/
  Server running... press ctrl-c to stop.
看到如上内容时就成功了,本地访问http://127.0.0.1:4000/即可查看效果。
定制
我把博客实现的的插件基本上都封装起来了,可以直接在浏览器按 F12 查看我是怎么引入的。如果你想增加新的渲染规则,可以新建_layouts目录,将你自己的渲染规则放进去,见目录结构 -Jekyll。
遇到问题
$ bundle install
An error occurred while installing http_parser.rb (0.6.0), and Bundler cannot continue.

In Gemfile:
  jekyll was resolved to 4.2.1, which depends on
    em-websocket was resolved to 0.5.2, which depends on
      http_parser.rb
打开错误日志
"pkg-config --exists openssl"
 package configuration for openssl is not found
原因:没有正确设置PATH导致的问题
mac 使用默认的ruby 版本,要更新最新版本 ruby 并且覆盖
解决方法:
$ brew install ruby
$ brew link --overwrite ruby
If you need to have ruby first in your PATH run:
echo 'export PATH="/usr/local/opt/ruby/bin:$PATH"' >> ~/.zshrc

For compilers to find ruby you may need to set:
export LDFLAGS="-L/usr/local/opt/ruby/lib"
export CPPFLAGS="-I/usr/local/opt/ruby/include"

For pkg-config to find ruby you may need to set:
  export PKG_CONFIG_PATH="/usr/local/opt/ruby/lib/pkgconfig"
在 .zshrc 加入 ‘export PATH=”/usr/local/opt/ruby/bin:$PATH”’
$ source ~/.zshrc
加入 Live2D 看板娘
参考了:
由于 live2d 的协议是 GPL,这里我不把它的源码拷贝到自己的博客项目了,直接用链接引入。在 html 的任意位置,或是我博客对应的append选项下插入下述 html 代码:
<link
  rel="stylesheet"
  href="https://cdn.jsdelivr.net/gh/Dreamer-Paul/Pio@2.4/static/pio.min.css"
/>
<script
  defer="defer"
  src="https://cdn.jsdelivr.net/gh/Dreamer-Paul/Pio@2.4/static/l2d.min.js"
></script>
<script
  defer="defer"
  src="https://cdn.jsdelivr.net/gh/Dreamer-Paul/Pio@2.4/static/pio.min.js"
  onload='
    if (screen.width > screen.height)
    {
      let pio_container = document.createElement("div");
      pio_container.classList.add("pio-container");
      pio_container.classList.add("right");
      document.body.insertAdjacentElement("beforeend", pio_container);
      let pio_action = document.createElement("div");
      pio_action.classList.add("pio-action");
      pio_container.insertAdjacentElement("beforeend", pio_action);
      let pio_canvas = document.createElement("canvas");
      pio_canvas.id = "pio";
      pio_canvas.style.width = "14rem";
      pio_canvas.width = "600";
      pio_canvas.height = "800";
      pio_container.insertAdjacentElement("beforeend", pio_canvas);
      let pio = new Paul_Pio({
        "mode": "draggable",
        "hidden": true,
        "content": {
          "skin": ["要换成我的朋友吗?", "让她放个假吧~"],
          "custom": [{
            "selector": "a",
            "type": "link",
          }, {
            "selector": ".sidebar-toggle",
            "text": "打开侧边栏叭~"
          }, {
            "selector": ".effect-info",
            "text": "哇,你发现了什么!"
          }, {
            "selector": "#sidebar-search-input",
            "text": "想搜索什么呢?很多干货哦!"
          }, {
            "selector": "#toc",
            "text": "这是目录~"
          }, {
            "selector": ".page-title",
            "text": "这是标题~"
          }, {
            "selector": ".v",
            "text": "评论没有审核,要对自己的发言负责哦~"
          }]
        },
        "model": [
          "https:\/\/cdn.jsdelivr.net/gh/imuncle/live2d/model/33/model.2018.bls-winter.json",
          "https:\/\/cdn.jsdelivr.net/gh/imuncle/live2d/model/platelet-2/model.json",
          "https:\/\/cdn.jsdelivr.net/gh/imuncle/live2d/model/xiaomai/xiaomai.model.json",
          "https:\/\/cdn.jsdelivr.net/gh/imuncle/live2d/model/mashiro/seifuku.model.json",
          "https:\/\/cdn.jsdelivr.net/gh/imuncle/live2d/model/seele/model.json",
          "https:\/\/cdn.jsdelivr.net/gh/imuncle/live2d/model/Violet/14.json",
          "https:\/\/cdn.jsdelivr.net/gh/xiaoski/live2d_models_collection/Kobayaxi/Kobayaxi.model.json",
          "https:\/\/cdn.jsdelivr.net/gh/xiaoski/live2d_models_collection/mikoto/mikoto.model.json",
          "https:\/\/cdn.jsdelivr.net/gh/xiaoski/live2d_models_collection/uiharu/uiharu.model.json"]
      });
    }'
></script>
自定义参数见Dreamer-Paul/Pio,模型收集自imuncle/live2d和xiaoski/live2d_models_collection,。
$\KaTeX$
参考:
<link
  rel="stylesheet"
  href="//cdn.jsdelivr.net/npm/katex@0.12.0/dist/katex.min.css"
/>
<script
  src="//cdn.jsdelivr.net/npm/katex@0.12.0/dist/katex.min.js"
  defer="defer"
></script>
<script
  src="//cdn.jsdelivr.net/npm/katex@0.12.0/dist/contrib/auto-render.min.js"
  defer="defer"
  onload='renderMathInElement(document.body, { delimiters: [{left: "$$", right: "$$", display: true}, { left: "$", right: "$", display: false }, {left: "\\(", right: "\\)", display: false}, {left: "\\[", right: "\\]", display: true}]})'
></script>
不过这样仅能显示 $E=mc^2$ 这样的行间公式,行内公式是没有办法显示的(issue)。
$$
E=mc^2
$$
一种方法是引入 mathjax 进行渲染,但是这样做就失去了用 katex 的初心了。后来我发现 katex 有对应的插件可以解决这一问题。在上面代码后补充如下代码:
<script
  src="//cdn.jsdelivr.net/npm/katex@0.12.0/dist/contrib/mathtex-script-type.min.js"
  defer="defer"
></script>
效果如下。
\[E=mc^2\]可以在这个页面查看一些别的插件,比如化学方程式的插件等等,都是可以引入的。
mermaid 图
我希望自己能按照 markdown 代码块扩展的规则来写 mermaid 流程图:
```mermaid
sequenceDiagram
Alice->>John: Hello John, how are you?
loop Healthcheck
    John->>John: Fight against hypochondria
end
Note right of John: Rational thoughts!
John-->>Alice: Great!
John->>Bob: How about you?
Bob-->>John: Jolly good!
```
其效果如下。
sequenceDiagram
Alice->>John: Hello John, how are you?
loop Healthcheck
    John->>John: Fight against hypochondria
end
Note right of John: Rational thoughts!
John-->>Alice: Great!
John->>Bob: How about you?
Bob-->>John: Jolly good!
因此需要插入如下内容(将代码块隐藏,并在原位置插入 mermaid 图):
<style>
  pre.language-mermaid,
  code.language-mermaid {
    display: none;
  }
</style>
<script
  src="https://cdn.jsdelivr.net/npm/mermaid@8.7.0/dist/mermaid.min.js"
  defer="defer"
  onload='
    for(let x of document.getElementsByClassName("language-mermaid"))
      if(x.nodeName=="CODE")
      {
        let m = document.createElement("div");
        m.classList.add("mermaid");
        m.textContent = x.textContent;
        x.parentNode.insertAdjacentElement("beforebegin", m);
      }'
></script>
prism 代码高亮
默认的代码高亮器rouge渲染出来的效果一般,同时代码行号效果非常差。这里使用了 prismjs 来进行代码渲染。它的好处是模块化程度非常高,且支持自定义插件。
这里我引入了四个插件(代码行号、动态代码高亮、工具栏、括号匹配,且自己写了一个选中全部代码的按钮)作为例子,也可以像我一样自己定制。
<link
  rel="stylesheet"
  href="https://cdn.jsdelivr.net/combine/npm/prismjs@1.21.0/plugins/line-numbers/prism-line-numbers.min.css,npm/prismjs@1.21.0/plugins/toolbar/prism-toolbar.min.css,npm/prismjs@1.21.0/plugins/match-braces/prism-match-braces.min.css,npm/prism-themes@1.4.0/themes/prism-nord.min.css"
/>
<script
  src="https://cdn.jsdelivr.net/combine/npm/prismjs@1.21.0/components/prism-core.min.js,npm/prismjs@1.21.0/plugins/autoloader/prism-autoloader.min.js,npm/prismjs@1.21.0/plugins/line-numbers/prism-line-numbers.min.js,npm/prismjs@1.21.0/plugins/toolbar/prism-toolbar.min.js,npm/prismjs@1.21.0/plugins/match-braces/prism-match-braces.min.js"
  async="async"
  data-autoloader-path="https://cdn.jsdelivr.net/npm/prismjs@1.21.0/components/"
  onload='
    document.body.classList.add("line-numbers","match-braces");
    Prism.plugins.toolbar.registerButton("select-code", function (env) {
      let button = document.createElement("button");
      button.textContent = "select this " + env.language;
      button.addEventListener("click", function () {
        if (document.body.createTextRange) {
          let range = document.body.createTextRange();
          range.moveToElementText(env.element);
          range.select();
        } else if (window.getSelection) {
          let selection = window.getSelection();
          let range = document.createRange();
          range.selectNodeContents(env.element);
          selection.removeAllRanges();
          selection.addRange(range);
        }
      });
      return button;
    })'
></script>
评论系统
配置详见https://utteranc.es/。请使用你自己的 repo!
<script
  repo="wu-kan/utterances-storage"
  src="https://utteranc.es/client.js"
  issue-term="url"
  theme="github-light"
  crossorigin="anonymous"
  async="async"
></script>